Sunday 27 January 2013

New Job!!!


Hello everyone, welcome to the blog.  As the title says I have been given a new job at short notice.  I've been appointed to Linton-on-Ouse as an instructor on the Tucano training baby fighter pilots for the RAF and Royal Navy.  Initially I only had 2 weeks notice but they pushed it back a few weeks so I actually start in the middle of February.

I am looking forward to flying the Tucano again, I last flew it in 1999 as a student and from what I remember it was a lot of fun.  Having chatted to a friend of mine who recently has done the job, the syllabus has expanded some what with some really cool stuff, formation aerobatics, Air Combat Manoeuvering etc!  Basics first though, I've got to remember how to start the thing first!


I'll be living in the Officer's Mess up there which means I'll have plenty of modelling time but it does mean I've got to move everything up there, that will be a pain but once I'm settled it'll be better than sitting in the little shed outside!  It also means I'll be living away from the family which is going to be really tough but I'll get to see them pretty much every weekend and it won't be forever.  It's better than spending 7 months away on a ship!

Right, I've been quite busy with 2 models finished and we're not even at the end of January yet!  The first is Tamiya's excellent P-51B in 1:48.  The kit is getting on a bit now and there are a few obvious inaccuracies (such as the wheel wells/main spar) but in the end it looks great and it goes together like a Tamiya kit should.  I built it for a friend of mine who flew the restored "Princess Elizabeth" at Duxford with The Fighter Collection.  I needed to get this one done ASAP so it was done straight from the box.


Now back to the armour side of things, well, I say armour but this is a soft skin.  Tamiya's Opel Blitz is a great kit, again some say there are some accuracy issues but a)  I have no idea what they are, the model looks good to me, and b)  I couldn't give a shit anyway!  Accuracy doesn't really bother me unless it's really obvious and usually some one has to point these things out to me anyway!

Anyway, to enhance the kit I bought Hauler's photo etch set (which looks suspiciously like Trumpeter/Hobby Boss PE so I bet that's who the sub contractor is) and the Mig Productions resin tarpaulin.  This is a great moulding and I really cannot recommend it highly enough.


I wanted to do a DAK vehicle so I could go to town on the dusty look, I hope I achieved it!  In any case, it was great fun to do and I really enjoyed the challenge.  There is an ongoing article in Scale Modelling Now internet magazine.  It's only £1 a month, bargain!  For that you get access to not only the current content but 3 years worth of  back issues/content including all the techniques videos.  Talking of which, I have done a series of short "How to" videos on how to weather an old oil drum!


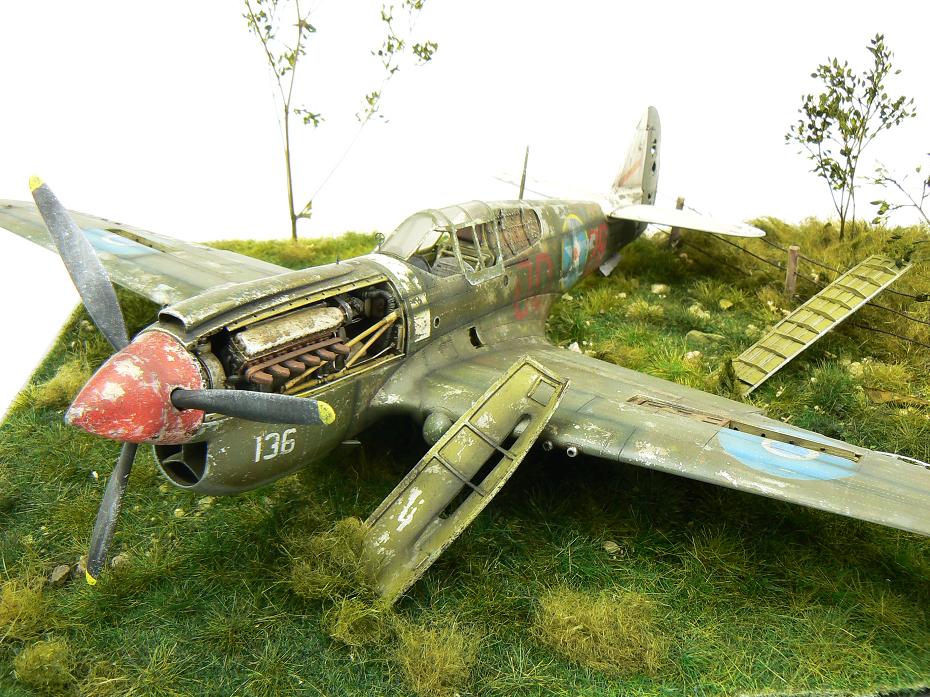
That's almost it, just a quick preview on what I'm working on at the moment.  It's a bit of a departure for me but should provide a great canvass for some pretty cool weathering!


Righto, I'm off to watch Professor Brian Cox's new series on telly.  He's awesome and I'm not embarrassed to say I've got a bit of a man crush on him!

Laters

Jamie

Saturday 12 January 2013

Review of 2012

Welcome to my review of 2012.  As you can see, I've had quite a productive year, not just in quantity but I have developed as a modeller, especially in my AFV modelling.  I am learning all the time and fusing the traditional AFV techniques and adapting them to aircraft has been difficult but I think it's been successful although I have some way to go yet.

Anyway, enough waffle, on with the models.

Tamiya P-47D Razorback 1:72

I threw everything I could at this model.  All the Eduard photo etch sets, all the Quickboost sets, Barracudecal decals and did a full rivet job.  I'm really proud of this model and it's one of my favourites.


Dragon Sherman 105 1:72

Sticking with 1:72 and this is the Dragon Sherman.  This was my first foray into the small scale for AFVs which had it's own challenges, a really deft touch is required.


Hasegawa Fw 190D-9 1:32

Something a bit bigger now and Hasegawa's lovely Fw 190D-9.  I've always wanted to make this kit and was pleased how it turned out.  It's not had a riveting job which is unusual but it did get an MDC cockpit.

Great Wall Hobby P-61 Black Widow 1:48

The challenge with this model was the black paint job but using all the techniques in my repetoire I think I pulled it off.  This was the original uncorrected boxing built for SAM magazine and "The Airbrush Company" as a demonstrator (The Airbrush Company are the importer for GWH).


Dragon StuG IIIG 1:35

This was another very involved project as I threw the very comprehensive Voyager photo etch set at it.  It's also got Fruil tracks which are time consuming but well worth it.  The time spent on these was offset by the time saved by using Quick Wheel masks, a brilliant invention.

Airfix Swordfish 1:72

What a beautiful kit.  If you haven't got one I highly recommend it, this was a close contender for my kit of the year.  She's done in the colours of my old Lynx squadron 815 during the Battle of Taranto.  A victory we celebrate each year (as opposed to the RAF celebrating their draw in the Battle of Britain!).


Hasegawa P-40E 1:32

Hasegawa's P-40s are some of my favourite kits.  This had a load of photo etch and rivets added.


Eduard Bf 109E-1 1:48

Another close contender for kit of the year.  This one was done out of the box for SAM magazine.


Tamiya JS-2 1:35

Back to the heavy metal now and Tamiya's superb JS-2 with Aber photo etch and barrel, Mig Productions resin fuel tanks and bed spring armour.  This was my first go at figure painting so go easy!  I also placed it on a Miniart vacform vignette.


Monogram B-17G 1:48

I hadn't made this kit since I was a teenager, it was very crude but nostalgic.  This had a complete True Details resin interior, Eduard photo etch, Quickboost engines and the Verlinden detail set thrown at it.  A very involved project indeed.


Airfix Lynx HMA. 8 "Evelyn" 1:48

I've been waiting for this kit for a long time.  You all probably know the story behind it so I shan't bang on agaon but just in case I haven't bleated enough, this is the aircraft I flew in HMS Somerset in 2009 and to say that Airfix including my aircraft as a decal option made me thrilled is a bit of an understatement!


Tamiya Gekko 1:48

This isn't strictly a 2012 model as I built it some years ago.  It was rubbish so it was stripped  seams tidies and rivets applied.  I then used it as a test piece for testing techniques to create an abandoned aircraft.  I think it turned out OK and this was the basis for the P-40 model.

Eduard Bf 110E 1:72

A close run thing this but this kit is my runner up for kit of the year.  It's simply beautiful.  I built 5 in a row, the last having all the available (at the time) resin accessories (plus rivets of course).


Tasca Sherman Firefly IC

When I started armour modelling a couple of years ago I asked the members of Missing-Lynx what is the 1 kit I should make.  Pretty much all of them stated a Tasca Sherman and this year I did just that.  There's not much to say other than they were right!


OK, that's the lot.  Quite a lot in fact!ORD TO Putte in Belgium.  There's only one word to Putte in Belgium.  There's only one word to Putte in Belgium.  There's only one word to Putte in Belgium.  There's only one word to describe this "superb"!  I can't thank Fred, Yves, Jan and everybody else for their generosity and hospitality, I can't wait to catch up with you all again.  

I've done quite well in competitions this years as well, I won't list them as that smacks of ego etc but I shan't be entering Telford this year as I shan't be going.  I don't get many "weekends" off having 4 kids so I'm saving myself for Euromilitaire.  The competition has a much higher reputation than Telford, certainly among the figure and armour modellers and this is where I shall focus my efforts.  Not that I'm building for competitions or anything "in the style of", it's just I want to enter this one and if I get anything I'll be both surprised and chuffed.

Anyway, just one last picture and it's of the P-40 vignette.  Some animals (sheep and seagulls) arrived from a model railway place the other day so they've been added  My first 2013 model is (finally) complete.

Talking of 2013, I've made a resolution.  I will not buy or accept review models this year.  I'll be selling a few kits but I really want to drive down the stash this year, I hate having a stash with anything more than 2 or 3 models in it but it's grown to over 50!  That's 2 and a half years worth so even though there are some very cool kits coming out (Hobby Boss P-61 1:32, Trumpeter P-40 1:32, Revell Lynx HAS. 3 1:32, Eduard Spitfire IX 1:48 and Bf 109G-6 1:48 to name a few) I'm going to be strong!

So, until next time take care and Happy New Year.


Friday 4 January 2013

RNZAF Hasegawa P-40M: Part Eight - FINISHED!!!!

Thank you to the people who have signed up and sponsored me for the "Dryathalon".  It's a very worthy cause and the more we can do to help eradicate it the better.  There is still time to donate so if you want to help out, click on the link.  Thanks.

Jamie's Dryathalon fund raising page


Modelling

Good news, the model is finished.  I have to say I've learnt loads on this project and thoroughly enjoyed every step.  OK, here's the dit on the base.


Groundwork

I had a custom MDF base to which I glued on the ground work.  This was split into 2 parts, the main part was a grass mat from Model Scene (Russian stony steppe).  The long grass is some fake animal fur from Treemendus.  I thought I might have a bit of trouble with this however it was quite straight forward.

Once it was trimmed to size it had a "haircut" with some sharp curved scissors.  A very dilute mix of Vallejo Model Air Russian 4BO green was liberally worked in which stained it to a grass colour.  The grass was dried with a hairdryer although it was combed with an animal grooming brush to prevent the hairs sticking together in clumps.  Once dry this was also glued onto the base.

The fence was made from a scrap wooden window blind and some soft 0.5mm wire left over from a Fruil metal track set.  The stakes were drilled ready to accept the wire and then stained with oil paints, the wire was brush painted with Vallejo Camo Black Brown.

The trees were from Joefix and you'll probably notice some clumps of long grass on the Steppe, these were trimmings from the long bit.

The final thing was to place the model on the base and then add all the loose bits, these were placed in areas where I had trimmed the grass to stop the floating look.

And that they say is that!


So, what a great project.  By far my favourite aspect of modelling is painting and weathering and I think you'll agree a project such as this provides pretty much the ultimate canvass for this sort of thing.

Well, as one chapter closes another one opens.  My next model will be something quite a bit different, an Open Blitz truck from the Afrika Korps!  This one won't be a SBS, I'll be doing it for Scale Modelling Now internet magazine.  The format is quite similar to the blog although there will be the added bonus of technique videos and the like.  It's also very cheap, a 12 month subscription will only cost you £12, for that you not only get the next year's issues but also access to the last 3 years' articles, walk rounds, reviews, techniques bank, video demonstrations etc!  Bargain!

Next week I'll be doing my "Review of 2012", not only will I be showcasing my models from last year but also I'll be deciding my Kit of the Year and various other things along the same lines.

So until then take care.


Wednesday 2 January 2013

RNZAF Hasegawa P-40M: Part Seven - Weathering

Happy new year to you all.  Yesterday (New Year's Day) I had a shocking head ache all day brought on by celebrating the New Year with the neighbours.  It will be last drink for a while as I am taking part in The Dryathalon.  I aim to not drink any alcohol for the whole month with the aim to raise money for Cancer Research UK.  Feel free to sponsor me if you like, all donations will be very gratefully accepted, just click on the link and hit he "donate" button.  Thanks.

http://www.justgiving.com/dryathlete-jamie-haggo

Onto the model.  The P-40 is pretty much finished, so much so attention has turned to the base but more of that in the next installment.

Oil dot weathering

My favoured method of weathering is using oils.  However, as a base I applied a filter, this is a very thin wash, more of a dirty thinners really.  The aim is to blend the camouflage and to impart a grimy feel to the model.  For this I normally us AK Interactive's Winter Streaking Grime which is a nice dirty grey green tone, I thin it right down with White Spirit and then apply with a soft brush.

Now for the oils themselves.  The aim is to local filters.  Note, I use tiny dots of oil paints, for a green camouflage such as this I find it's best to add a little yellow and bright green, this will ensure chromatic richness.  Just using white and buff with wash out the colour leaving it too bleached and in extreme, chalky.


The oil is worked into the surface using a damp brush, don't have it too damp, just moist enough to work the oil paint.  Whatever you do don't streak it back!  Aeroplanes do not fade in this way and it is not at all realistic.

The effect is really subtle, almost too subtle when a model such as this has a "busy" surface with all the chips etc.  The other advantage to using oils is that a realistic smooth metal sheen is imparted.

Note I have repainted the centre of the roundels blue, my thanks to Pete Mossong for the steer.


The underside is done in the same way but I leave out the strong colours such as green, yellow and blue.  In this case just UN Dirty White, Buff and Shadow Brown from Abteilung.  The latter is a very versatile tone and I use it constantly.  In these next pictures you can see the grimy tone it imparts.  I also added a tiny bit of deep rust in the flap area.


For the white areas on top I had to go quite careful.  It would be very easy to do too much but the advantage with oils is they remain workable for a long time.  Here's the upper surface of the tail plane in progress.


With the main of the weathering done attention turned to the canopy.  The clear areas had a mist of very diluted Tamiya XF-4 which is Zinc Chromate, this will give the characteristic yellowish tone (although the camera didn't really pick this up).  Then a very dilute mix of Black, Neutral Grey and Red Brown gave it a dark, dirty tone.


Now it was time for all the fiddly bits.  I won't bore you as you can see for yourself the photos but what you will see is the spinner and prop.  The spinner had originally been painted white but then over sprayed with red hence the chipping.

Also the undercarriage legs were detailed with photo etch and heavily weathered.  The base coat was a mix of Alclad Dark Iron and Dark Aluminium, it was then chipped with Vallejo German Camo Black Brown applied with a sponge.  To finish, a wash using the Shadow Brown oil paint was applied followed by a dry brushing with the Dark Rust oil paint.

I'll leave you with some photos of the finished (almost) model.  Next I'll be using a few pigments to finish off and building the base.  So until then, take care.